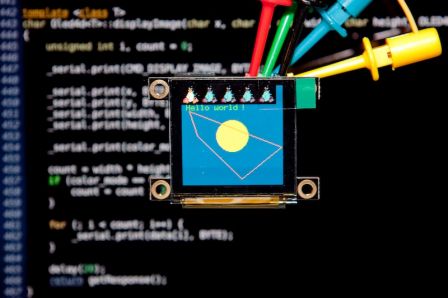
Voici un exemple très simple expliquant l'utilisation de la bibliothèque libre Oled4D dont j'ai parlé dans un précédent billet.
Ce programme va afficher l'image ci-dessous :
Le code source commenté est affiché en seconde partie de ce billet.
Plus d'informations :
Voici les étapes à suivre pour tester cette bibliothèque :
- Décompresser l'archive dans le dossier libraries
- Ouvrez l'environnement de développement Arduino
- Dans le menu Fichier > Exemples, il doit y avoir un menu Oled4D > Example > Demo, cliquez dessus pour l'ouvrir
- Compilez et chargez la cible
Voici une partie du code source (la déclaration de data_image à été tronquée volontairement), l'exemple va afficher un écran bleu, affiche un cercle jaune, 1 tux, réalise 4 copier / coller de l'image du tux, affiche du texte « Hello world ! » puis créé un polygone.
/*  Oled4d
    Programme d'exemple pour interface Arduino / Écran Oled de 4DSystems
 */

#define RED     RGB(255, 0, 0)
#define GREEN   RGB(0, 255, 0)
#define BLUE    RGB(0, 0, 255)
#define YELLOW  RGB(255, 255, 0)
#define WHITE   RGB(255, 255, 255)
#define BLACK   RGB(0, 0, 0)

#define SMALL   FONT_5X7
#define MEDIUM  FONT_8X8
#define BIG     FONT_8X12

#include <NewSoftSerial.h>
#include <HardwareSerial.h>
extern HardwareSerial Serial;
#include <Oled4d.h>

NewSoftSerial serial(2, 3);

// count : 1152
#define  DATA_IMG_WIDTH   24
#define  DATA_IMG_HEIGHT  24
char data_image[] = {
    0x0, 0x0, 0x0, 0x0, 0x0, 0x0, 0x0, 0x0, 0x0, 0x0, 0x0, 0x0, 0x0, 0x0, 0x0, 0x0,
    0xc6, 0xc6, 0xff, 0xff, 0xff, 0xff, 0xff, 0xff, 0xff, 0xff, 0xff, 0xff, 0xff, 0xff, 0xbe, 0xbe,
    [...]
    0x0, 0x0, 0x0, 0x0, 0x0, 0x0, 0x0, 0x0, 0x0, 0x0, 0x0, 0x0, 0x0, 0x0, 0x0, 0x0,
    0x0, 0x0, 0x0, 0x0, 0x0, 0x0, 0x0, 0x0, 0x0, 0x0, 0x0, 0x0, 0x0, 0x0, 0x0, 0x0,
};

void setup()
{
    Serial.begin(9600);

    // Mode série
    pinMode(2, INPUT);
    pinMode(3, OUTPUT);

    // Configuration de l'interface série logicielle
    serial.begin(9600);
}

void loop()
{
    // Créer l'objet en interface série logiciel
    Oled4dSoft oled = Oled4dSoft(serial, 8);

    // Pour utiliser l'uart « hardware », procéder ainsi :
    //Oled4dHard oled = Oled4dHard(Serial, OLED_RESET_PIN);

    // Initialise l'écran
    oled.init();

    // Efface l'écran
    oled.clear();

    // Fond d'écran bleu
    oled.setBG(RGB(0, 0, 128));

    // Dessine un cercle
    oled.drawCircle(64, 64, 20, RGB(255, 255, 0));

    // Affiche l'image
    oled.displayImage(0, 0, DATA_IMG_WIDTH, DATA_IMG_HEIGHT, COLORMODE_65K, data_image);

    // Copier / coller de l'image 5 fois
    for (int i = 1; i < 5; i++) {
        oled.screenCopyPaste(0, 0, i * DATA_IMG_WIDTH, 0, DATA_IMG_WIDTH, DATA_IMG_HEIGHT);
    }

    // Affiche du texte
    oled.drawText(1, 3, SMALL, GREEN, "Hello world !");

    // Dessine un polygone
    char array[] = { 10, 32, 20, 64, 76, 120, 127, 64 };
    oled.drawPolygon(sizeof(array) / 2, array, RGB(255, 128, 0));

    while (1);
}
Voilà, je pense que le code est assez explicite, en cas de souci, n'oubliez pas le forum d'aide.
